Guide Notes[]
- Alignment and timing changes many things in this generation.
- Being either too far light or dark can prevent events from spawning, possibly causing you to miss recruiting new characters.
- Keep an eye on your turn count, taking too long to reach certain events can cause the gauge to shift from a Light Bonus to a Dark Bonus (or vice versa).
- If you're using the perfect path guide along side this, then you should be fine. If your alignment is different, keep in mind you may see different events from whats listed.
Notes[]
- Random battles will have random enemy formations. If you don't get whats listed, don't worry; the list is only to give you an idea of the tier/level that can spawn.
- Spelling and names: Keep in mind that for some characters/locations the names may be different depending on whether your playing the EU or NA version.
- Names in the guide should match the names of their associated wiki pages (e.g. the NA version).
Party Members[]
- Rex - Main Character
- Dyshana
- Beatrice
- Murmina
- Returning Characters - Plum, Qua, Ellis, Vira-Lorr, Vashtor, Reverie, Sharona and everyone else except 4th Generation's hero and heroines.
Dungeons[]
D1: Uttara Kulu[]

- First screen: This dungeon consists of mountain type areas. This first screen is a straightforward path with no treasures, continue on to the second screen.
- Second screen: Make your way to the top left of this area until you come to two bridges. Take the bridge on the left and immediately take a right after you cross it. You will find a treasure containing
 SHINY FANG at the end of this path. Return to where you turned from and head to the top left of the screen for the next area.
 - Third screen: Straightforward area. Follow the path all the way to the top left and you will come across three treasures containing FORBIDDEN TOME IV,
 INT UP+ and CLAIRVOYANCE . Retrace your steps back to the second screen.
 - Second screen: Head straight over the bridge and then take the second bridge to the right of the screen. Follow this path to the fourth area.
- Fourth screen: Head to the right and and drop down a couple step to find a treasure containing VESSEL OF LIFE . You'll also spot a second treasure containing RESIST FRAME in this area. Climb up the steps to the top left of the screen and continue on until you reach the next area. Be warned, a battle will ensue.
- Fifth screen: When first entering this screen, you may receive a cutscene along with a battle. After the battle Murmina will join your party. After the scene, you will see some steps to your character's front right that you can climb. Follow this path to the next area.
- Sixth screen: Follow the path while climbing some steps. When the path looks like it splits, head to the top right of the screen. You will come to a treasure containing CRIMSON EDGE. Go back to the split and head left this time to the next area.
- Seventh screen: You'll notice a treasure on a cliff above you, but you can't quite grab it yet. Follow the path all the way until you reach the top left of the screen. A treasure containing O-KNUCKLES will be sitting on a step. Now jump up on the step to your right and follow it (stay on this upper cliff) all the way back to the bottom right. You'll have to drop down to a cliff below you at one point. After this point you'll finally reach the chest, inside you will find SECRET ARTS XVII. You can now exit the dungeon via the top left zone in this area.
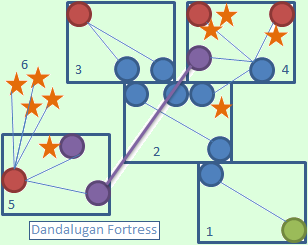
D2: Dandalugan Fortress[]

(Once the boss battle of this dungeon has been completed, you will not be able to re-enter this dungeon!!!)
- First screen: Got some nice new scenery and areas for this dungeon. This first screen is a straightforward path. Just run on ahead and enter the castle.
- Second screen: Another straightforward path, continue on to the third screen.
- Third screen: Once again, another straightforward path. Head down the narrow path up the stairs, and start heading back to the bottom right of the screen while staying on the second floor. The zone leads back to the second screen.
- Second screen: Head around the corner and you'll spot a door on your left. Continue for a bit and just ahead you'll find a treasure containing NIGHTMARE. Head through the door to the fourth screen.
- Fourth screen: Start running straight and you'll enter a large open area. Continue going straight to reach some steps with two treasures awaiting at the top. You'll find O-BANGLE and HERMES RING inside them. Head back down the stairs and go to your right to find another set of stairs with another treasure containing an AURA RING . Enter the large open area again and this time head to the bottom left of the screen to find a path to the fifth screen.
- Fifth screen: Follow the path past the broken staircase until you come to some blocks that you can jump on. Jump up the blocks and stick to the left hand side of the screen to the top left to enter the sixth screen.
- Sixth screen: This screen is a small storage room of four treasures. Inside the treasures you'll find TRIPLE FEATHER, VIT UP+, EXTRA HEAL and TREE OF LIFE. Head back to the fifth screen.
- Fifth screen: Head down the path infront of you and to the right of Rex you'll notice the blocks you jumped up earlier but they seem broken. Run past them and you'll spot another set that are in perfect condition. Jump up the blocks and head left to find a treasure containing THREE STARS and the zone to the next area. Be warned, a cutscene will start and you will enter a boss fight.
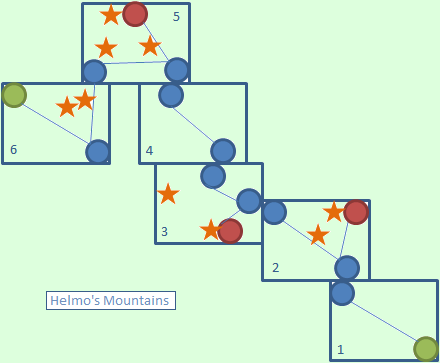
D3: Helmos Mountains[]
- First screen: This dungeon will consist of mountain type areas that you have seen in previous dungeons. This first screen is straightforward and consists of no treasures. Make your way to the top left of the area to enter the second screen.
- Second screen: Follow the path ahead of you, you'll have to jump up many steps. Half way through this area, you'll spot a treasure chest which contains STARDUST. To the right of this treasure are some more steps you can jump up. At the top of the steps is another treasure containing MISTY GUARD. Go back down these steps to where the first treasure was and head left to continue on the path to the third screen.
- Third screen: Follow the path and you will shortly come to a bridge. After cross it, run to the bottom right of the screen to find a chest containing LUK UP+. Go back to the bridge you crossed and you'll see a second bridge to the left. Cross this bridge and right in-front of you will a chest containing ACCESSORIES 3-I. From this treasure run to the top right of the screen to find the fourth area.
- Fourth screen: Straightforward path with no treasures. Head in the direction of the top left of your screen and you'll eventually come to the fifth screen.
- Fifth screen: Hop up the steps above your character and you'll immediately spot another set up cliffs you can jump up. At the top of this set you'll find a chest containing a REFRESH HERB. Stay on this level of the mountain and head to the top left of the screen. You'll find another set of cliffs to jump up. At the top to your left will be another treasure containing RING OF INABILITY. From this chest, head straight down to drop off the cliff. You'll land on a small area containing yet another chest which contains a SKULL STAFF . Drop off this cliff and head down and you'll spot the zone to the sixth screen below you.
- Sixth screen: You've seen this next area before. Above you are two treasures, but you have to go all the way around the area to reach them. Make your way to the very top left of this area. You'll see the zone to leave this area (this exits the dungeon) and to the right of it will be a small step you can jump up. Jump up this step and start making your way to the bottom right of the area. At some point the cliff you're on will end, drop down off this cliff and run to your right. You'll be on the cliff with the two treasures. Inside you'll find SANCTUARY and SARNGA. Head back to the top left of this area to exit the dungeon.
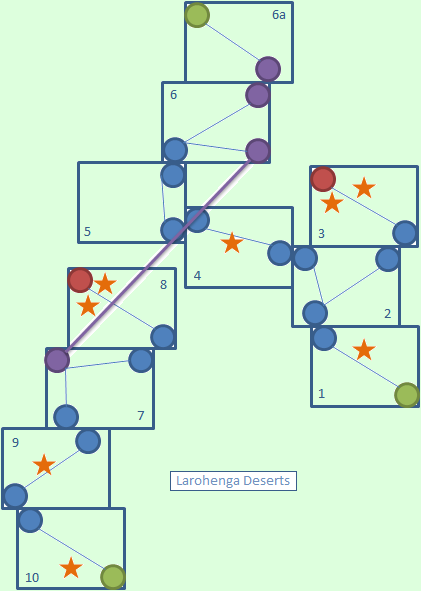
D4: Larohenga Deserts[]

- First screen: This dungeon has desert type areas. You first experienced some of the areas if you have entered Tresor Island, the Fourth Generation DLC dungeon. This first area is a straightforward path. On the way to the top left of the screen, you'll come across a treasure on your right. Inside you'll find INT UP+. Continue on down the path to reach the second screen.
- Second screen: This area consists of four zones and is somewhat of a puzzle similar to the Frozen Woods dungeon in the second generation. First make your way to the top right of the area and enter into the third screen.
- Third screen: This area is a straightforward path with a dead end. At the end is two treasures. Inside them you'll find ACCESSORIES 3-II and AGI UP+. Retrace your steps to the second screen.
- Second screen: This time make your way to the top left of the screen and enter the zone.
- Fourth screen: Head to the top left and you'll spot a treasure containing ACCESSORIES 3-III. Continue Left to the fifth screen.
- Fifth screen: Nothing of interest here. Just head to the top right of the screen to exit to the sixth screen.
- Sixth screen: Here, you can first take a slight detour to find the North Exit, which is needed to get one of Sharona's CG's. Make your way to the top right of the screen to go to the north exit screen. Else go to the bottom right and skip to the seventh screen portion of this guide.
- North Exit Screen: This is just a straight forward path, make your way to the top left of the screen and exit the dungeon. Now you can re-enter the duneon, and make your way to the bottom right of the screen to end up back at the sixth screen.
- Sixth screen: Now go to the bottom right to enter the seventh screen.
- Seventh screen: First, go up to the top right to enter eighth screen.
- Eigth screen: Make your way to the top left to find 2 treasure chests, containing GINNA'S SCYTHE and CRUEL FRAME. Head back down to the bottom right to return to the seventh screen.
- Seventh screen: Now head to the bottom left of the screen to enter the ninth screen.
- Ninth screen: In the center of this screen you'll find a chest containing a TRUE EMBLEM. From here run to the bottom left of the screen to find the zone to the tenth screen.
- Tenth screen: This is the exit screen for the southern exit. Head to the bottom right, where you'll find a DRAGOON LANCE. After grabbing the treasure, continue to the bottom right to exit the dungeon.
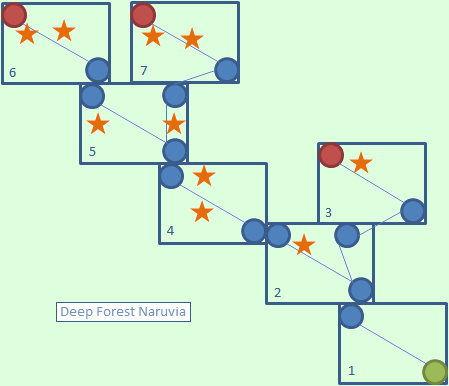
DLC: Deep Forest Naruvia[]
(This dungeon can only be visited if downloaded from the Xbox Live Marketplace or Playstation Store. It is available after the battle at Guisado Gaza.)
- First screen: As you would have guessed, this dungeon consists of forest type areas from earlier dungeons in the game. This first area is a straightforward path with no treasures. Head to the top left of the area to reach the second screen.
- Second screen: Make your way to the top left of this area. You'll will come upon a treasure resting right next to a zone. Inside this chest you will find a DARK FINGER / BLACK FRAME. Do not enter the zone next to the treasure just yet, head to the right of the zone and you will find another zone not far off. Enter this one to reach the third screen.
- Third screen: This area is pretty small and is a dead end with one treasure. Inside the treasure you will find RAY / SANSENTOU. Retrace your steps back to the second screen.
- Second screen: Go through the zone you passed before. Head to the bottom left of the screen from where you are and you'll see it shortly on your left.
- Fourth screen: A straightforward path. As you cross the first bridge, you'll see a treasure containing DURANDAL / CRUEL FRAME on the small island. Continue on your way through the path. As you cross the last bridge you'll see another treasure containing STR UP+ / BYAKKO'S BRACELET directly in-front of you. From here make your way to the left of the tree and you'll spot the zone to the fifth screen.
- Fifth screen: Exact same area as the second screen. Head to the top left of the area, cross the bridge and you'll spot a treasure next to a tree. Inside the treasure you'll find DIVINE ATTACK / DEADLY BLOW . Go through the zone to the left of the treasure to the sixth screen.
- Sixth screen: This area is a dead end with a couple treasures. Inside the treasures are RESURRECTION / HALPER SCYTHE and LOUISETTE / ARTEMIS. Retrace your steps back to the fifth screen.
- Fifth screen: From the zone, head directly right from where you are. You'll end up dropping off a cliff to into a small canyon. You'll also see a treasure on your right side sitting on a cliff. Inside you'll find BLACK FRAME / BLOOD RED. Head to the top left of the screen from the treasure and you'll spot the zone to the seventh screen.
- Seventh screen: Follow the path and you'll see small ponds to the top right of your screen. Sitting next to the ponds is a treasure containing MAX HP UP+ / GENBU'S GAUNTLET . Continue on the path to find the last treasure of this dungeon which contains BLOOD RED / REPPU. That's all for this dungeon.
Walkthrough[]

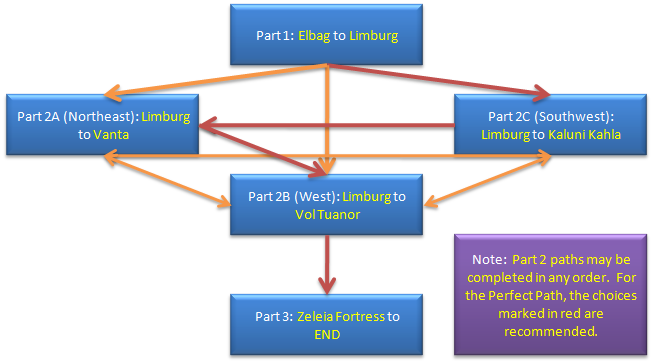
Fifth Generation, Part 1 Elblag to Limburg
- Fifth Generation, Part 2A Limburg to Vatna
- Fifth Generation, Part 2B Limburg to Vol Tuanor
- Fifth Generation, Part 2C Limburg to Kaluni Kahla
- Fifth Generation, Part 3 Zeleia Fortress to End